Building a Mercedes sprinter motion detecting van alarm with remote pager

I wanted to protect my home on wheels with a nice alarm system that could page my cell phone when an intruder was detected.
After much research and calling various car alarm installers in my area I came to the conclusion that it wasn’t worth the expense, the risk to my van’s wiring, and voided warranty. The commodity car alarm systems like Viper seem stuck in the dark ages and they don’t have a wide range of detection methods.
Being a tinkerer of electronics it just so happened I had all I needed to build a superior alarm system and have peace of mind ASAP.
-
RedBear Duo: an Ardiuno that connects to particle.io.
-
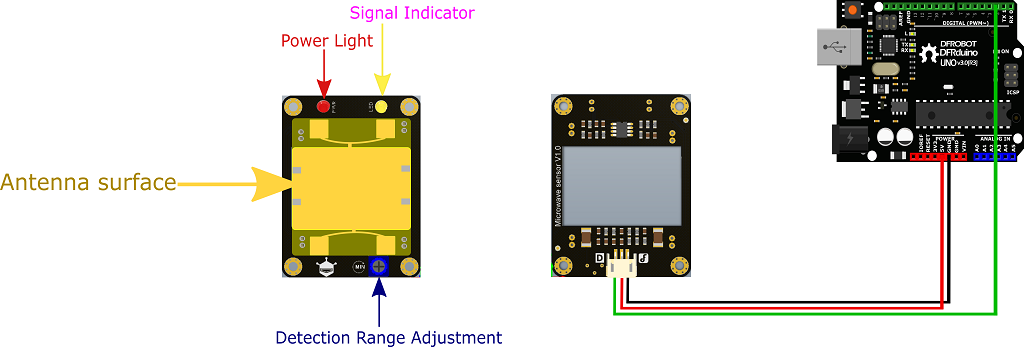
Two of these: DF Robot Gravity Microwave Sensor 2.0.
Creating a Wifi to Cellular Access point for remote paging from the van.
I needed a stable mobile internet access point for the van so I used an old Google Pixel Generation one phone that I kept for this purpose. They’re available on amazon.com for about $100 which is cost competitive with any other solution such as a Verizion mifi or etc.
GoogleFi will give you a free data-only SIM card on request and it will use your same cell phone plan to provide the van with access to the internet.
Macrodroid was used to automate the restarting of the Wifi Hotspot since it can otherwise periodically turn off.
Setting up the Arduino ‘Alarm Brain’
Connect the RedBear Duo to the van network.
Getting started with RedBear Duo
Connect the device to the particle.io cloud.
Wire the sensor.
Connect the DF Robot microwave sensor to digital pin D5, power to 3v3 and to ground as outlined in the wiki here.

Program the Device.
In the particle webIDE you can program the Alarm with the following code.
int microwave0 = D5;

// This is the setting you will need to adjust depending on how sensitive your sensor is.
int MotionClassifyGreaterThan = 900;

int value0 = HIGH;// Microwave LOW == motion detected, HIGH == no motion
int MotionEvents = 0;
bool alarmTriggered = false;
bool alarmArmed = true;

unsigned long timeElapsed = 0;
unsigned long timeStarted = millis();
unsigned long timeWait = 10000;
bool success = false;

void setup() {
    pinMode(microwave0, INPUT);
    success = Particle.function("toggle", toggle);
    timeStarted = millis();
}

void doMath() {
    if(alarmArmed) {
        timeElapsed = millis() - timeStarted;
        if(value0 == LOW) {
          MotionEvents += 1;
        }

        // Report every 10s the amount of motion events.  Alarm on > MotionClassifyGreaterThan
        if(timeElapsed > timeWait) {
            Particle.publish("PMotionDetected", "10s " + String(MotionEvents), 1, PRIVATE);
            if(MotionEvents > MotionClassifyGreaterThan) {
                Particle.publish("MotionDetected", "10s " + String(MotionEvents), 1, PRIVATE);
            }
            // Reset timer
            timeStarted = millis();
            MotionEvents = 0;
        }
    }
}

void loop() {
    value0 = digitalRead(microwave0);
    doMath();

}

int toggle(String Extra) {
    alarmArmed = !alarmArmed;
    if(alarmArmed) {
        Particle.publish("AlarmStatus", "Alarm Armed", 1, PRIVATE);
        alarmTriggered = false;
        MotionEvents = 0;
        timeStarted = millis();
    } else {
        alarmTriggered = false;
        Particle.publish("AlarmStatus", "Alarm Disarmed", 1, PRIVATE);
        MotionEvents = 0;
    }
    return alarmArmed;
}
Create a 1$/mo Twilio.com account
You can use a trial account for free on twilio.com and then add a phone number for 1$/mo.
You must add a phone number to the account for outoging texts to be sent to your phone.
Grab your username and password from the twilio dashboard.
Setup the webhook in Particle.io
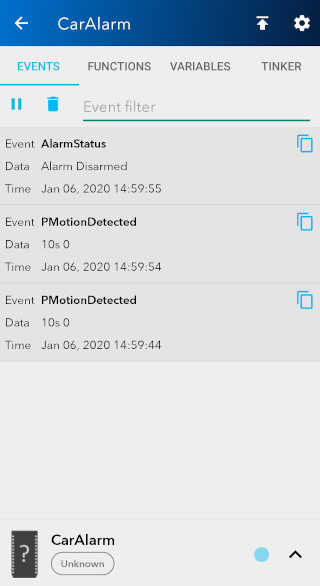
By now you should be able to see a list of events coming from the car alarm device particle.io console.
The events will tell you how much motion is coming off the sensor every 10s.
- These events are going to alarm via the webhook
MotionDetected 10s 1076 CarAlarm 1/6/20 at 12:50:44 pm- These events are below the threshold for alarming.
PMotionDetected	10s 0	CarAlarm	1/6/20 at 12:50:34 pm
PMotionDetected	10s 25	CarAlarm	1/6/20 at 12:50:24 pm
Go to your particle.io console and add a new “Integration” to your product for the car alarm.
The type of the integration to pick is “Webhook”
Integration Info
| Parameter | Setting |
|---|---|
| Event Name | MotionDetected |
| Full URL | https://api.twilio.com/2010-04-01/Accounts/YOUR-TWILIO-ACCOUNT-NUMBER-HERE/Messages.json |
| Request Type | POST |
| Request Format | Web Form |
| Form | |
| Auth | |
| Headers | |
| Enforce SSL | Yes |
| Response Topic | {{PARTICLE_DEVICE_ID}}/hook-response/{{PARTICLE_EVENT_NAME}} |
Finish Van Installation
If you’ve gotten this far congratulations!
Now all you have to do is install and tune the alarm in your van.
Install to the ceiling with velcrow sticky tape
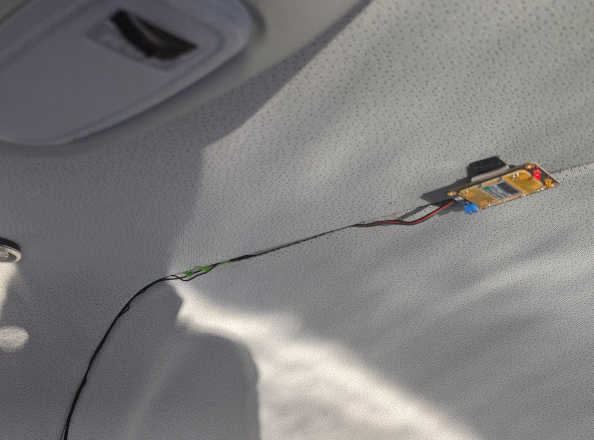
I decided the best place for my sensor on the ceiling above the two front seats. This gives us motion detection for the entire front of the van and side door.
Connect to USB power
You will need a usb power supply that is continuously on to power the phone and arduino.
Tune the motion sensor
There is a dial on the motion sensor for how sensitive it is.
You have to pick a setting on the dial and then watch the MotionEvents in the particle console to determine a threshold for when the windows/doors open.
There will be a certain amount of ’noise’ due to the sensitivity of the sensor.
It can penetrate the van walls and you may find that useful.
Once you find a good threshold that you want to alarm for you can set it up in the code that we configured the Arduino with (MotionClassifyGreaterThan).
I’ve installed the particle app on my phone so that I can watch the event stream and arm/disarm easily from my phone.

You can arm and disarm the alarm from you cell phone by calling the function called “toggle” from the mobile particle app.
Enjoy peace of mind
Now your van is a full blown smart van!
The possibilities are endless because now you have full control and customization options for the alarm system.
Future Ideas
-
Adding more sensors such as an accelerometer.
-
Adding a DC alarm siren.